Friday, April 1, 2011

Nvidia Geforce 5 FX Series drivers for Windows 7

Windows 7 drivers are available UNOFFICIALLY for the cards listed below:

  • FX 5100
  • FX 5200 / FX 5200 ULTRA /FX 5200 LE
  • FX 5500
  • FX 5600 / FX 5600 ULTRA / FX 5600 LT
  • FX 5700 /FX 5700 ULTRA / FX 5700 LE / FX 5700 VE
  • FX 5800/ FX 5800 ULTRA
  • FX 5900/ FX 5900 ULTRA / FX 5900 XT/ FX 5900 ZT
  • FX 5950 ULTRA
  • PCX 5300
  • PCX 5750
  • PCX 5900
To use these graphic cards with windows 7 operating system, kindly follow these instructions:
  1. Download windows vista driver of your graphic card from NVIDIA website using the link below. The driver type must match with operating system (32-bit or 64-bit).
  2. After done downloading, right-click on the driver setup file and choose 'Properties'. Click 'Compatibility' tab and tick the box saying 'Run this program in compatibility mode for:'. Choose windows vista from the drop down menu and click 'Apply'.
  3. You are done ! Install the driver and restart your computer !
  4. Have fun :)
  • Note: This setting might not work on some graphic cards. If the blue screen appears, please uninstall the driver.

My test setup:
  • Pentium 4 Northwood socket 478,2.40Ghz, FSB: 533MHz, L2 cache: 512 kb
  • ZOTAC Geforce FX 5200, agp 4x/8x, 256MB DDR, 128-bit
  • WD 160 GB
  • IBM 6824-6AA Motherboard
  • 1GB DDR SDRAM [Apacer]
  • Windows 7 Ultimate 32-bit

Result:


Pic_1: Desktop view with glass effects
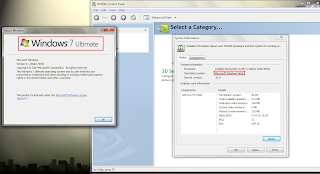


Pic_2 : Windows 7 OS vs Windows vista driver :)


Driver Download Link: http://www.nvidia.com/Download/index.aspx?lang=en-us

Sunday, October 11, 2009

Easily Create a Partition on Your Hard Disk with XP

1. Turn off your computer and install your new hard disk. It's unlikely that you have any unpartitioned space on which to create a new partition on the drive already in the machine, so you'll need to add a new drive. New drives typically don't come preformatted, so you'll need to create your own partitions and format them.

2. Start your computer and logon as an administrator. Click Start and then click the Run command. In the Open text box type: diskmgmt.msc and click OK.

3. A Wizard will appear when the Disk Management console opens. Go through the Wizard's steps and allow it to initialize the new disk, but do not allow the Wizard to convert the disk from basic to dynamic.

4. You will see, on the left side of the console, disk icons that represent "Disk 0″, "Disk 1" etc. Your new disk should be the one with the highest number. The size of the disk should be listed, and the word "Unallocated" should be just under the size. Right click where it shows the size of the disk and click the New Partition command.

5. Click Next on the New Partition Wizard Welcome page.

6. On the Select Partition Type page, click on both of the options and read the Descriptions. We'll assume here you're creating a primary partition. Select Primary partition and click Next.

7. On the Specify Partition Size page, type in the size of the partition. Depending on what you want to use the disk for, you might want to create more than one partition. Type in the size of the new partition in the Partition size in MB text box and click Next.

8. On the Assign Drive Letter or Path page, you can bind the partition to a drive letter or mount it in an empty NTFS folder. In this example, you'll do it the old fashioned way and assign the partition a new drive letter. Select the drive letter and click Next.

9. You need to format the partition to use it. Always use NTFS unless you need to allow other operating systems on the same machine to access the drive. You can use the defaults, or customize the Allocation unit size based on the types of applications you want to run on the disk. Click Next.

10. Click Finish.

Reformatting Your Computer Using Windows XP- Baby Steps

Reformatting your Windows XP computer will erase everything on your hard drive and reinstall the operating system. To avoid losing your data, you must backup your information...

1. First, make sure that your computer is set to Boot to CD. This is a different procedure depending on your computer. When your computer first boots look for an option to enter the BIOS settings. Under the BIOS settings find the "Boot Order" and make sure the CD-ROM is set to boot first.

2. With the Windows XP CD in the CD-ROM drive, save your BIOS settings and exit.

3. If you've done everything correctly you should be asked to "Press Any Key to Boot from CD".

4. After installing the necessary setup files, Windows XP will display your partitions. Delete any existing partitions by selecting the desired partition with the arrow keys, press D to delete and then L to confirm the deletion.

5. You should now have only one option, "Unpartitioned Space". Press Enter to install Windows XP to the unpartitioned space.

6. When asked how you would like to format the partition, select "Format using the NTFS file system".

7. After the partition is formatted, Windows XP will begin installation. The computer will reboot. While the computer is rebooting, please do not touch any keys.

8. Enter your product key. The the product key will be located on the back of the sleeve your CD came in.

9. When asked for Network Settings, choose "Typical Settings".

10. Windows XP will now complete installation. Upon completion you will need to re-install the drivers for your hardware (Modem, Sound, Video, etc). You can download current drivers from many manufacturer's support web sites.

11. Next turn on the Internet Connection Firewall.

12. Reconnect your computer to the Network.

13. Run Windows Update by opening Internet Explorer, then clicking on Tools -> Windows Update. Follow the on-screen instructions for installing critical updates.

14. Restart your computer.

Sunday, September 27, 2009

Hello world..!!

Hey guyz !! m new 2 ths thingy...
Ths blog is al abt Me, PCs, technologies, softwares, hardwares n much more...
Do view ths blog evrytm to keep urself up-to-date..
Nyway, do add me at ym..
poovin_91@yahoo.com